Updated on 11 Oct 2024
This tutorial shows how a field of a WS Form inside a BricksExtras‘ Modal can be filled with the data attribute values of the clicked buttons/links that open the modal.
This should also work with other plugin’s forms with a few adjustments.
Step 1
Install and activate BricksExtras and activate the license.
Enable Modal in the plugin’s settings.
Step 2
Create a form using your favorite forms plugin. Ours is WS Form.
Step 3
Edit your template/Page with Bricks.
Add two Buttons and a Modal element in a Section’s Container.

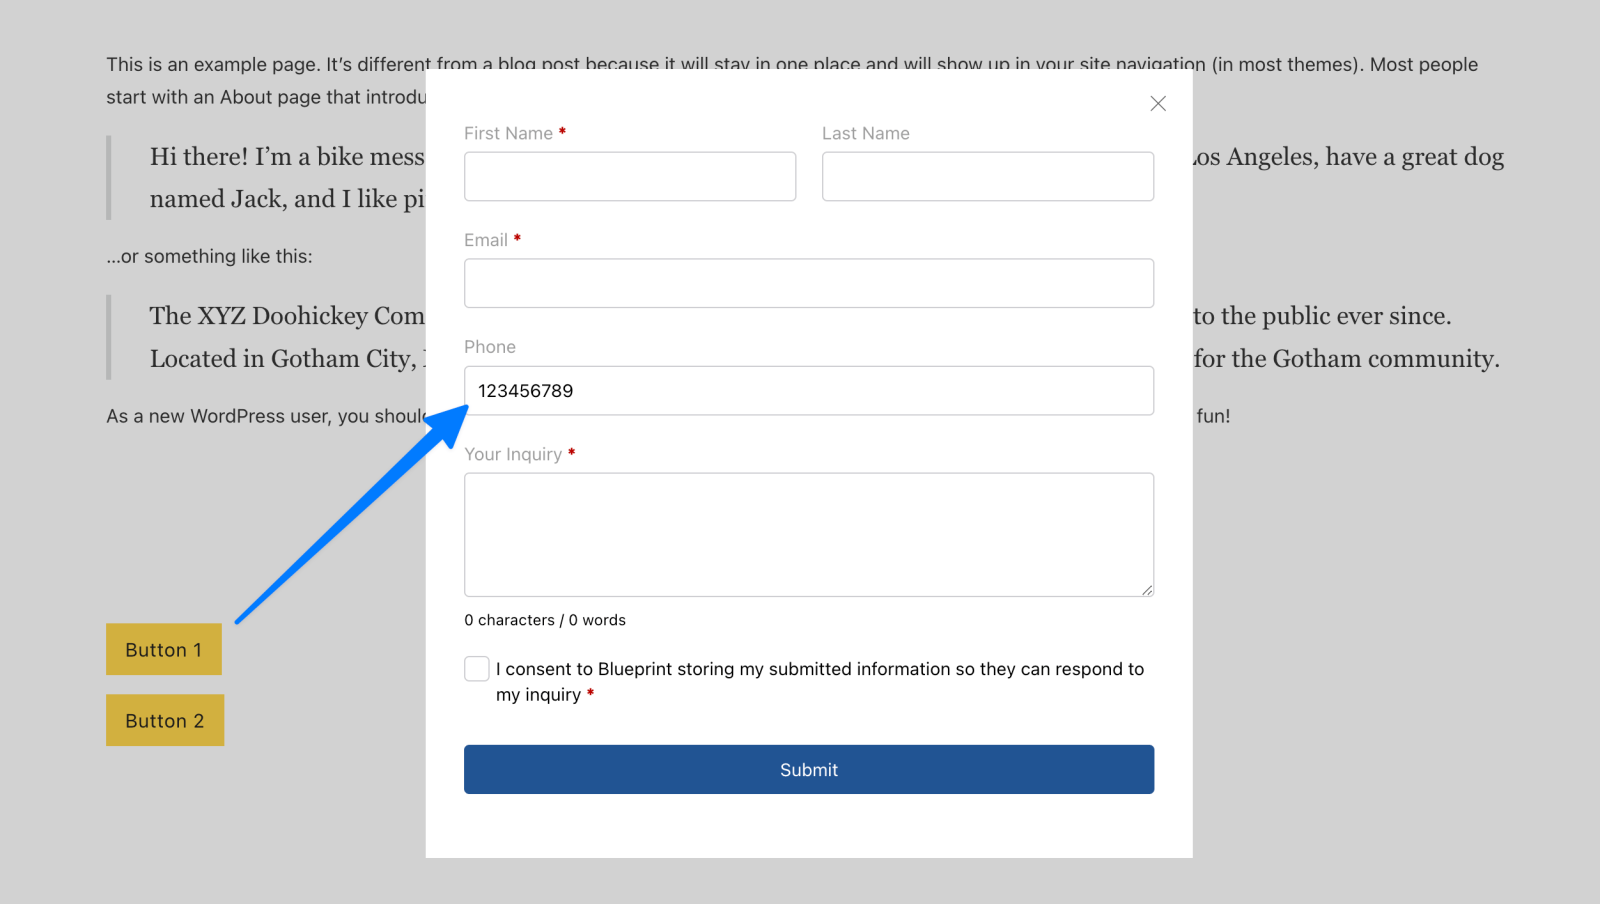
Set up data attributes for the buttons. For example,
for Button 1:

for Button 2:

Add a class of say, open-form-1 for both the buttons in the STYLE tab → CSS.
Configure the Modal element’s trigger like this:

Add this custom CSS for the Modal:
%root% .wsf-alert {
	margin-bottom: 0;
}
Add a WS Form element inside the Modal.
Pick the form that should be shown in the modal.
Step 4
Settings (gear icon) → PAGE SETTINGS → CUSTOM CODE → Body (footer) scripts:
<script>
document.addEventListener("DOMContentLoaded", (e) => {
  const buttons = document.querySelectorAll('.open-form-1');

  buttons.forEach(button => {
    button.addEventListener('click', function() {
      setTimeout(() => {
        const successMessage = document.querySelector('.x-modal .wsf-alert-success');

        const phoneValue = this.getAttribute('data-phone');

        const form = document.getElementById('ws-form-1');

        const inputField = form.querySelector('#wsf-1-field-4');

        if (successMessage) {
          successMessage.style.display = 'none';
        }

        form.style.display = 'block';

        if (inputField) {
          inputField.value = phoneValue;
        }
      }, 0); // increase the time (ms) if needed
    });
  });
});
</script>
Replace open-form-1 with the class that’s added to all the buttons.
Replace data-phone with the name of your attribute.
Replace ws-form-1 with the ID of your form. This can be obtained by inspecting the form (inside the modal) on the front end.
Replace wsf-1-field-4 with the ID of the field inside the form.
Inside of Query Loops
If your form and modal is inside of a query loop, the IDs of the form are going to be different, so we need to adjust the code to avoid using IDs.
document.addEventListener("DOMContentLoaded", () => {

   const loopElementID = 'brxe-dgflih'; /* the ID from the element with the query loop */
   const fieldName = 'field_29'; /* the 'name' attribute value on the tel input in the form */
  const buttons = document.querySelectorAll('.open-form-1');

  buttons.forEach(button => {
    button.addEventListener('click', function() {

      setTimeout(() => {

        const loopEl = this.closest('.' + loopElementID);
        const successMessage = loopEl.querySelector('.x-modal .wsf-alert-success');
        const phoneValue = this.getAttribute('data-phone');
        const form = loopEl.querySelector('.wsf-form');
        const inputField = form.querySelector('input[name="' + fieldName + '"]');

        if (successMessage) {
          successMessage.style.display = 'none';
        }

        form.style.display = 'block';

        if (inputField) {
          inputField.value = phoneValue;
        }
      }, 0); // increase the time (ms) if needed
    });
  });
});
You’d then want to first change the first three variables at the top.
The loopElementID is going to be the ID of the block/div/container with the query loop enabled.
The fieldName is the value of name attribute on the input where the value needs changing. (it will be field_X where X is the ID of the field inside of your WSForm settings, see image below for where to find the field ID)

Replace open-form-1 with the class that’s added to all the buttons.
And then lastly, replace data-phone with the name of your attribute if using a different attribute name.
Update 1 – Sending post data to the form inside a modal from a table row
Here’s how we can send the post title and post ID to a WS Form form inside a BricksExtras Modal with a query loop set on Nestable Table TBODY Row element:
Demo:
Enable these elements in BricksExtras’ settings: Modal, Nestable Table, WS Form.
Frames’ Table Alpha can also be used instead of BricksExtras’ Nestable Table.
The WS Form form used in this example has two fields of interest: A read-only “Job Title” field and a hidden “Job ID” field.

Here’s (mirror) a json export of the form if you want to import it in your site for reference.
Copy the Section’s JSON from here and paste in Bricks editor.

Click the Row for which query loop is enabled and select your post type, perhaps job.
For the Button element we added two data attributes: data-title and data-id with values set to corresponding Bricks dynamic data tags.
When the Apply button is clicked for a job post in the table on the front end, the objective is to grab the value of the data-title attribute for that table row and fill the form field with it.
Similarly, the value of data-id attribute for that table row will be filled in the invisible ID form field. This can be useful to ensure that the correct job is being referenced.
Settings (gear icon) → PAGE SETTINGS → CUSTOM CODE → Body (footer) scripts:
<script>
// Wait for the DOM to be fully loaded before executing the script
document.addEventListener( "DOMContentLoaded", () => {
    // Define constants for element IDs and field names
    const LOOP_ELEMENT_ID = 'brxe-vtgarx'; // The ID from the element with the query loop
    const TITLE_FIELD_NAME = 'field_8'; // The 'name' attribute value on the title input in the form
    const ID_FIELD_NAME = 'field_9'; // The 'name' attribute value on the ID input in the form

    // Select all elements with the class 'open-form'
    const buttons = document.querySelectorAll( '.open-form' );

    // Add click event listener to each button
    buttons.forEach( button => {
        button.addEventListener( 'click', handleButtonClick );
    } );

    // Function to handle button click events
    function handleButtonClick() {
        // Find the closest ancestor element with the specified ID
        const loopEl = this.closest( `.${LOOP_ELEMENT_ID}` );
        if ( ! loopEl ) return; // Exit if the loop element is not found

        // Find the form within the loop element
        const form = loopEl.querySelector( '.wsf-form' );
        if ( ! form ) return; // Exit if the form is not found

        // Find the success message, title field, and ID field
        const successMessage = loopEl.querySelector( '.x-modal .wsf-alert-success' );
        const titleField = form.querySelector( `input[name="${TITLE_FIELD_NAME}"]` );
        const idField = form.querySelector( `input[name="${ID_FIELD_NAME}"]` );

        // Get the title and ID values from the button's data attributes
        const titleValue = this.getAttribute( 'data-title' ) ?? '';
        const idValue = this.getAttribute( 'data-id' ) ?? '';

        // Use requestAnimationFrame for smoother DOM updates
        requestAnimationFrame( () => {
            // Hide the success message if it exists
            if ( successMessage ) {
                successMessage.style.display = 'none';
            }

            // Show the form
            form.style.display = 'block';

            // Set the title field value if it exists
            if ( titleField ) {
                titleField.value = titleValue;
            }

            // Set the ID field value if it exists
            if ( idField ) {
                idField.value = idValue;
            }
        } );
    }
} );
</script>
Replace
brxe-vtgarxwith the HTML ID of the query loop-enabled element8infield_8with the field ID of the Job Title form field9infield_9with the field ID of the Job ID form field
Make any changes as needed.